Introduction
Welcome to the documentation site for our Secure Storage Software : Qasmat.
Qasmat is a secure distributed storage system based on Shamir's Secret Sharing to split files into pieces and store them on a network of storage servers. It ensures data availability even when some servers are offline, without compromising security as in traditional redundancy. The system prevents an attacker having access to some servers from gaining information on the protected files.
This documentation provides information on how to install and use the software along with explanations on its security features and how it works.
Overview
Qasmat is a distributed secure storage software. The main idea is to securely split the file into shares and distribute them across a cluster of storage servers. The splitting and reconstruction processes use polynomials via Shamir's Secret Sharing to ensure the security of data at rest.
Here is an example of the steps involved in file protection, showing the different parts of Qasmat.
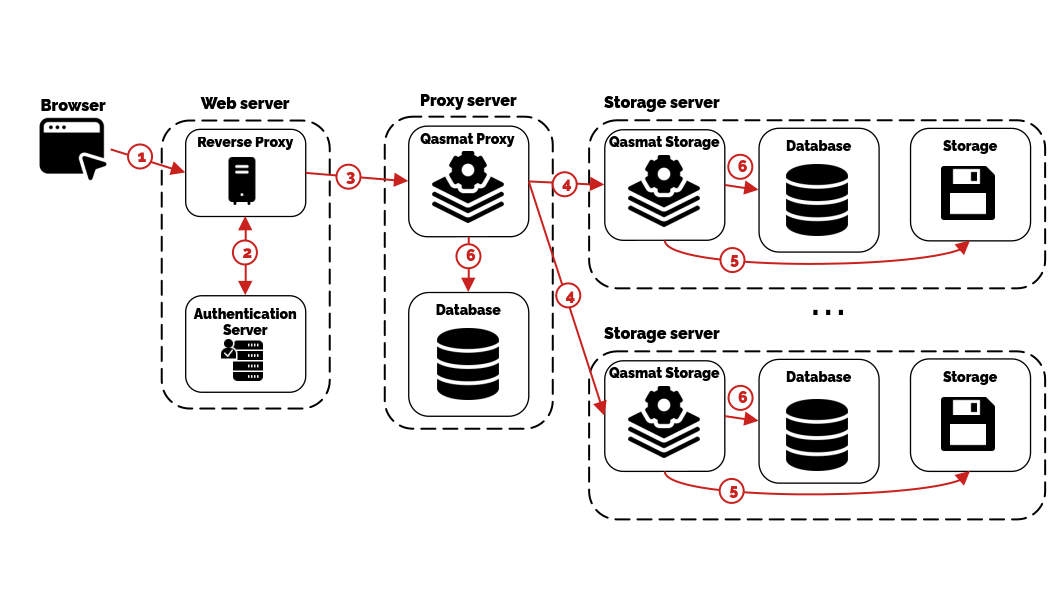
- The file is sent from the user's browser to the reverse proxy hosting the web pages.
- The authentication server ensures that the user is authenticated and returns the authenticated request.
- The request is sent to the Qasmat proxy, which handles calculations: the splitting of the file into shares using the Shamir's Secret Sharing scheme.
- The shares are distributed to the storage servers.
- The storage servers store the shares, either on disk or on an S3-compatible instance.
- Each binary stores the metadata about this protection. This data will be necessary for reconstruction later.
Once distributed, no trace of the file can be found on the proxy server, and the data stored on the storage servers are cryptographically independent of the file. This means no information can be extracted from one share alone.
Showcase
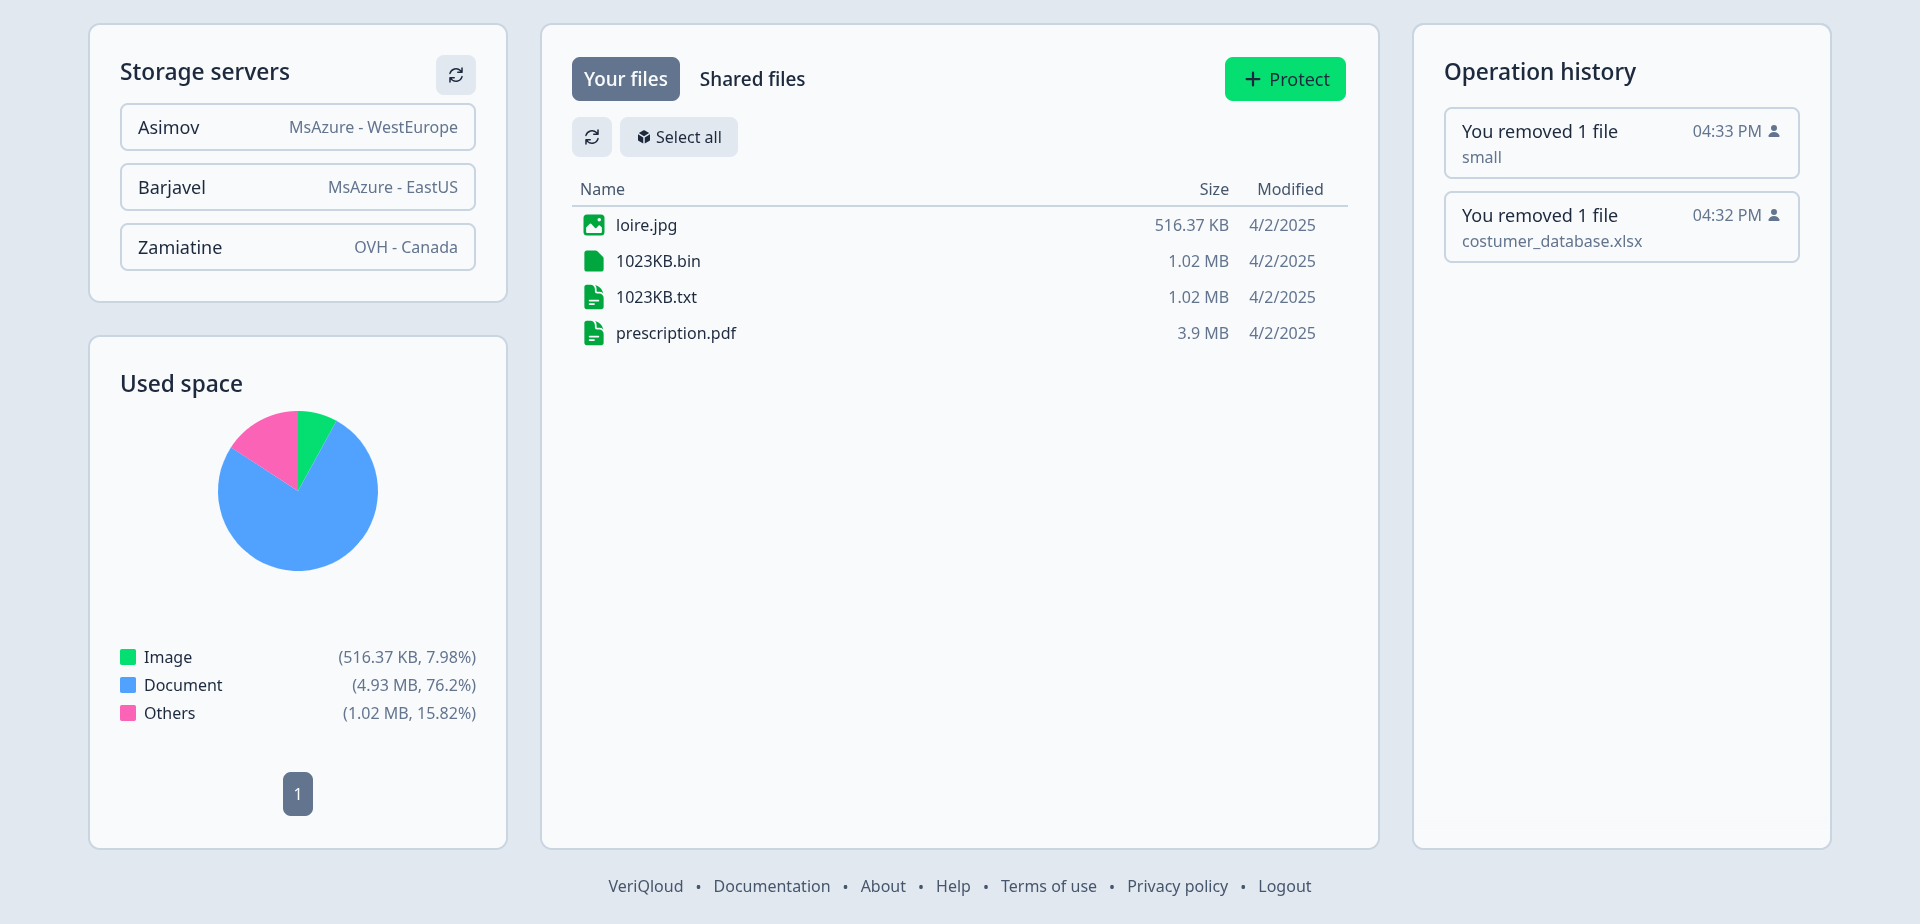
A deployment of Qasmat is publicly available for demonstration and testing purposes. Here is a screenshot of the graphical interface from a test user:
It is possible to organize a demonstration and/or create a test account for you. Don't hesitate to contact our business development director by clicking here.
Installation
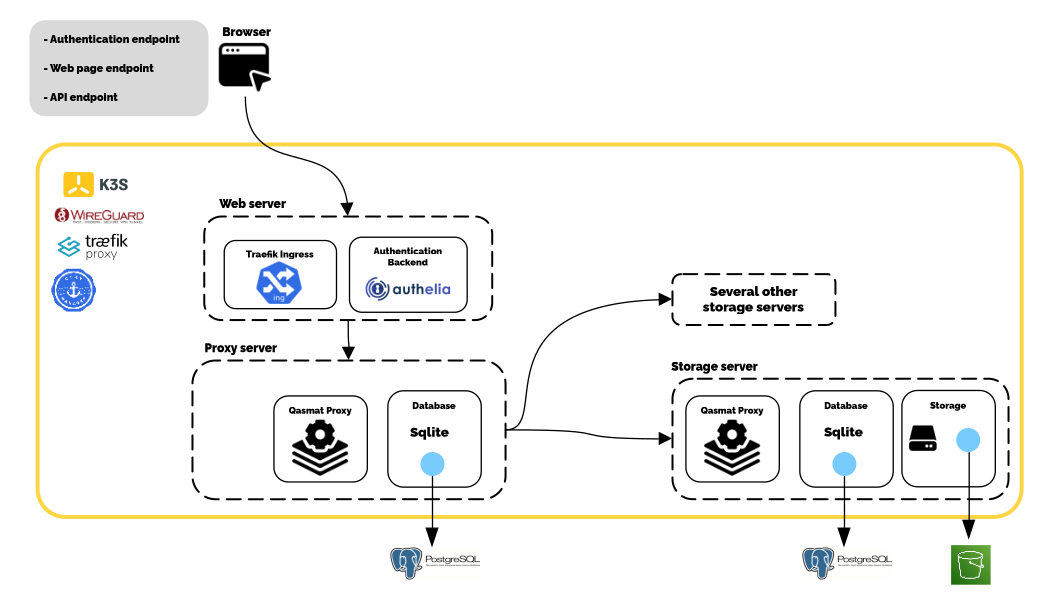
Our software consists of different elements:
- A proxy server (A): The binary (1) and its database (2).
- Storage servers (B): The binary (3), its database (4), and its storage (5).
- Another server (C): The reverse proxy (6) and the authentication service (7).
All these elements are contained in Docker containers and managed through a Kubernetes distribution: K3S. Additionally, the steps are simplified using Ansible scripts to manage configurations and ensure correct networking.
This section describes the different ways to deploy a Qasmat network on your infrastructure or on a cloud provider.
Cloud Service Providers
Our software is available on some cloud providers' marketplaces. Using these platforms can make deployment easier. Of course, we can provide support and onboarding for this deployment phase.
Outscale
Here is a description on how to deploy a basic Qasmat network in an Outscale environment. doc link directly to the (very complete) documentation of Outscale.
-
Create the security groups : doc
- webclient
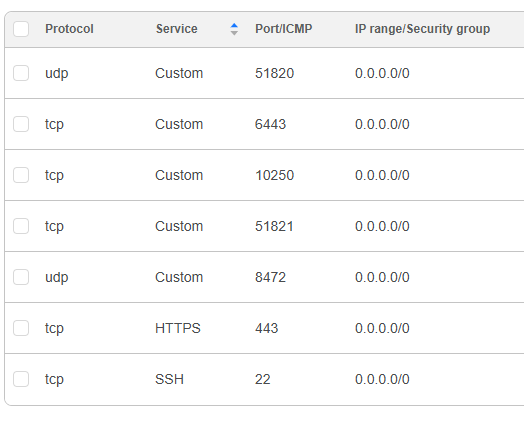
- proxy/storages
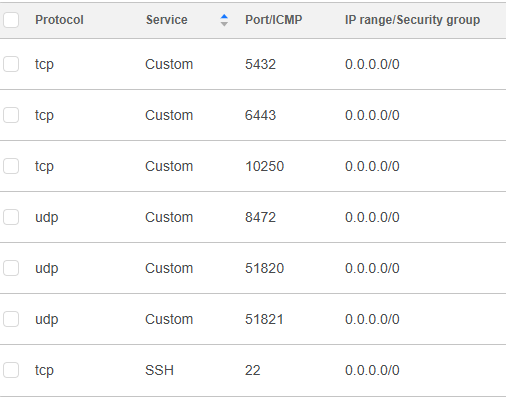
where IP/range for SSH service AND tcp 6443 is the IP of the admin, for https in 0.0.0.0/0 and for the others is 10.42.0.0/16 AND 10.43.0.0/16 by default (is changeable if necessary)
- Create public IPs for the vm of the webclient, proxy and storage(s) : doc
- Create VMs: doc; minimum hardware requirements proxy /storage, let public cloud option activated. Image: Ubuntu-24.04-2025-04-09 provided by Outscale. (Any ubuntu image >= 22.04 is ok), add ssh keys when demanded (obligatory to run ansible scripts). Minimum number of vms is 3: webclient, proxy and at least one separated vm that serves storages. See here for the minimum requirements
- Allocate the right public ip to the right vm: doc
- Create your ansible var files and run ansible scripts
Manual
It is possible to deploy the software without using any marketplace. This approach might be a bit more technical, but this section describes the steps. Of course, we can provide support and onboarding for this deployment phase.
Requirements
First, we assume that no VPN connection is established between the nodes where K3s will be installed. This would be the case, for example, in any multi-cloud or hybrid cloud environment.
The Embedded Multicloud K3s Solution is installed via an Ansible script.
Hardware Requirements
The requirements depends on the license, this is the minimum.
Proxy
| Minimum | Recommended | |
|---|---|---|
| CPU | 2 cores | 2 cores |
| RAM | 8 GiB | 16 GiB |
Storage
| Minimum | Recommended | |
|---|---|---|
| CPU | 1 core | 2 cores |
| RAM | 2 GiB | 4 GiB |
System Requirements
All nodes should satisfy the following requirements:
-
Operating System:
- Ubuntu 22.04 or later
- Python code should be able to run, which is typically the case with the default installation
ufwshould be disabled
-
Connection:
- SSH connection
- Root access
- Internet access
-
Basic Ports (should be open):
- 22 (SSH)
- 80 (HTTP)
- 443 (HTTPS)
-
Ports for K3s (should be open and available):
- 6443 (TCP, K3s supervisor and Kubernetes API Server)
- 8472 (TCP, Flannel VXLAN)
- 10250 (TCP, Kubelet metrics)
- 51820 (UDP, Flannel WireGuard IPv4)
- 51821 (UDP, Flannel WireGuard IPv6)
-
Ports for Qasmat (should be open and available):
- 30000 (NodePort for proxy)
- 49999 (Proxy port)
If internet traffic is blocked on the node, the cluster can still be managed through port forwarding (6443) via an SSH tunnel.
Configuration
Some parameters of the proxy and the storage servers and configurable. Depending on the deployement, our support might have already fill the correct values. Here is a template of both configuration files :
Proxy
{
  "network": {
    "path_to_preshared_key": "<path to the key that make the network private>",
    "port": "<port on which the proxy is available as a peer of the network>",
    "discovery": "Passive" (it wait for the storage servers to connect)
  },
  "api": {
    "address": "<api IP>",
    "port": "<api port>"
  },
  (parameters for the share renewal)
  "share_renewal": {
    "checking": {
      "years": (optional)"<number of years>",
      "days": (optional)"<number of days>",
      "hours": (optional)"<number of hours>",
      "seconds": (optional)"<number of seconds>"
    },
    "renewal": {
      "years": (optional)"<number of years>",
      "days": (optional)"<number of days>",
      "hours": (optional)"<number of hours>",
      "seconds": (optional)"<number of seconds>"
    },
    "expiration": {
      "years": (optional)"<number of years>",
      "days": (optional)"<number of days>",
      "hours": (optional)"<number of hours>",
      "seconds": (optional)"<number of seconds>"
    }
  }
}
Storage
{
  "proxy_reconnection_interval": <Interval in seconds for reconnection to the proxy>,
  "storage_mode": {
    "Disk" : {
        "path_to_folder": (optional) "<folder to store the share files>",
    }
    (or)
    "S3" :  {
        "region": "<Region of the S3 instance>",
        "bucket_name": (optional) "<Name of the bucket>",
    }
  },
  "network": {
    "path_to_preshared_key": "<path to the key that make the network private>",
    "discovery": {
      "Manual": {
        "servers": [
          {
            "address": "<Ip of the proxy>",
            "port": <port of the proxy>
          }
        ]
      }
    }
  }
}
Configuration files are also available in toml.
Database
Both the proxy and the storage servers require a database to manage files, users, and shares. Two backends are supported for the database. No additional configuration is required; simply set the environment variable DATABASE_URL as follows:
SQLite
-
Supported formats for
DATABASE_URLare:- File paths (e.g.,
test.db) - URIs (e.g.,
file://test.db) - Special identifiers (e.g.,
:memory:)
Example:
DATABASE_URL=mydatabase.db - File paths (e.g.,
PostgreSQL
-
DATABASE_URLmust be a PostgreSQL connection string.Example:
DATABASE_URL="postgresql://<user>:<password>@localhost:5432/<database name>" -
The user in the URL must be the owner of the database and have all privileges on it.
Storage
The storage servers receive shares from the proxy and then store them. Two types of storage are available, and the choice is made in the configuration.
Disk (Default)
The shares are directly stored on the disk where the storage server runs.
S3
The shares are sent to an S3 instance. For this mode, three environment variables are required:
AWS_ACCESS_KEY_ID=<id of the S3 access key>AWS_SECRET_ACCESS_KEY=<secret key for the S3 instance>AWS_REGION=<region of the S3 instance>
These environment variables are from AWS but work even if the S3 instance is not an AWS instance.
User Management
The access to the software is restricted to authenticated users. To handle user management, an instance of Authelia is deployed along the reverse proxy for the web client. There are two ways to integrate it with an authentication backend.
File
The user detail list is writen in a Yaml file as described by Authelia. E.g.
users:
  harry:
    disabled: false
    displayname: 'Harry Potter'
    password: '$argon2id$v=19$m=65536,t=3,p=2$BpLnfgDsc2WD8F2q$o/vzA4myCqZZ36bUGsDY//8mKUYNZZaR0t4MFFSs+iM'
    email: 'harry.potter@authelia.com'
    groups: []
  bob:
    disabled: false
    displayname: 'Bob Dylan'
    password: '$argon2id$v=19$m=65536,t=3,p=2$BpLnfgDsc2WD8F2q$o/vzA4myCqZZ36bUGsDY//8mKUYNZZaR0t4MFFSs+iM'
    email: 'bob.dylan@authelia.com'
    groups:
      - 'dev'
    given_name: 'Robert'
    family_name: 'Zimmerman'
    middle_name: 'Allen'
    nickname: 'Bob'
    profile: 'https://en.wikipedia.org/wiki/Bob_Dylan'
    picture: 'https://kelvinokaforart.com/wp-content/uploads/2023/01/Bob-Dylan.jpg'
    website: 'https://www.bobdylan.com/'
    gender: 'male'
    birthdate: '1941-05-24'
    zoneinfo: 'America/Chicago'
    locale: 'en-US'
    phone_number: '+1 (425) 555-1212'
    phone_extension: '1000'
    address:
      street_address: '2-3 Kitanomarukoen'
      locality: 'Chiyoda City'
      region: 'Tokyo'
      postal_code: '102-8321'
      country: 'Japan'
    extra:
      example: 'value'
The authentication is configured as explained by Authelia.
LDAP
We refere directly to the documentation of Authelia for setting up the integration with a LDAP instance.
Licensing
Qasmat is commercialized under different licenses, each of which limits certain parameters.
| License | Essential | Pro | Elite |
|---|---|---|---|
| Parameter | |||
| Number of storage servers | 3 | 5 | 10 |
| Number of users | 10 | 50 | 100 |
| Amount of storage* | 1 TB | 5 TB | 10 TB |
| Maximum file size | 1 GB | 5 GB | 10 GB |
*Warning: The amount of storage corresponds to the amount to be protected, not distributed. For example, if you store a file of 1 GB on 3 storage servers, the amount is 1 GB, not 3 GB.
Of course, it is possible to contact us for a custom license.
Usage
You will receive an encrypted license from VeriQloud, which the proxy server needs to run. When running the binary, the following argument is required: -p <path to encrypted license>. This license is then decrypted and applied. Below is a table summarizing the software's behavior when a limit is reached.
| Parameter | Behavior |
|---|---|
| Number of storage servers | The operation is blocked, and a message appears in the logs. |
| Number of users | The operation is blocked, and a message appears in the logs. |
| Amount of storage* | The operation is blocked, and a message appears in the logs and on the graphical interface. |
| Maximum file size | The operation is blocked, and a message appears on the graphical interface. |
Web Client
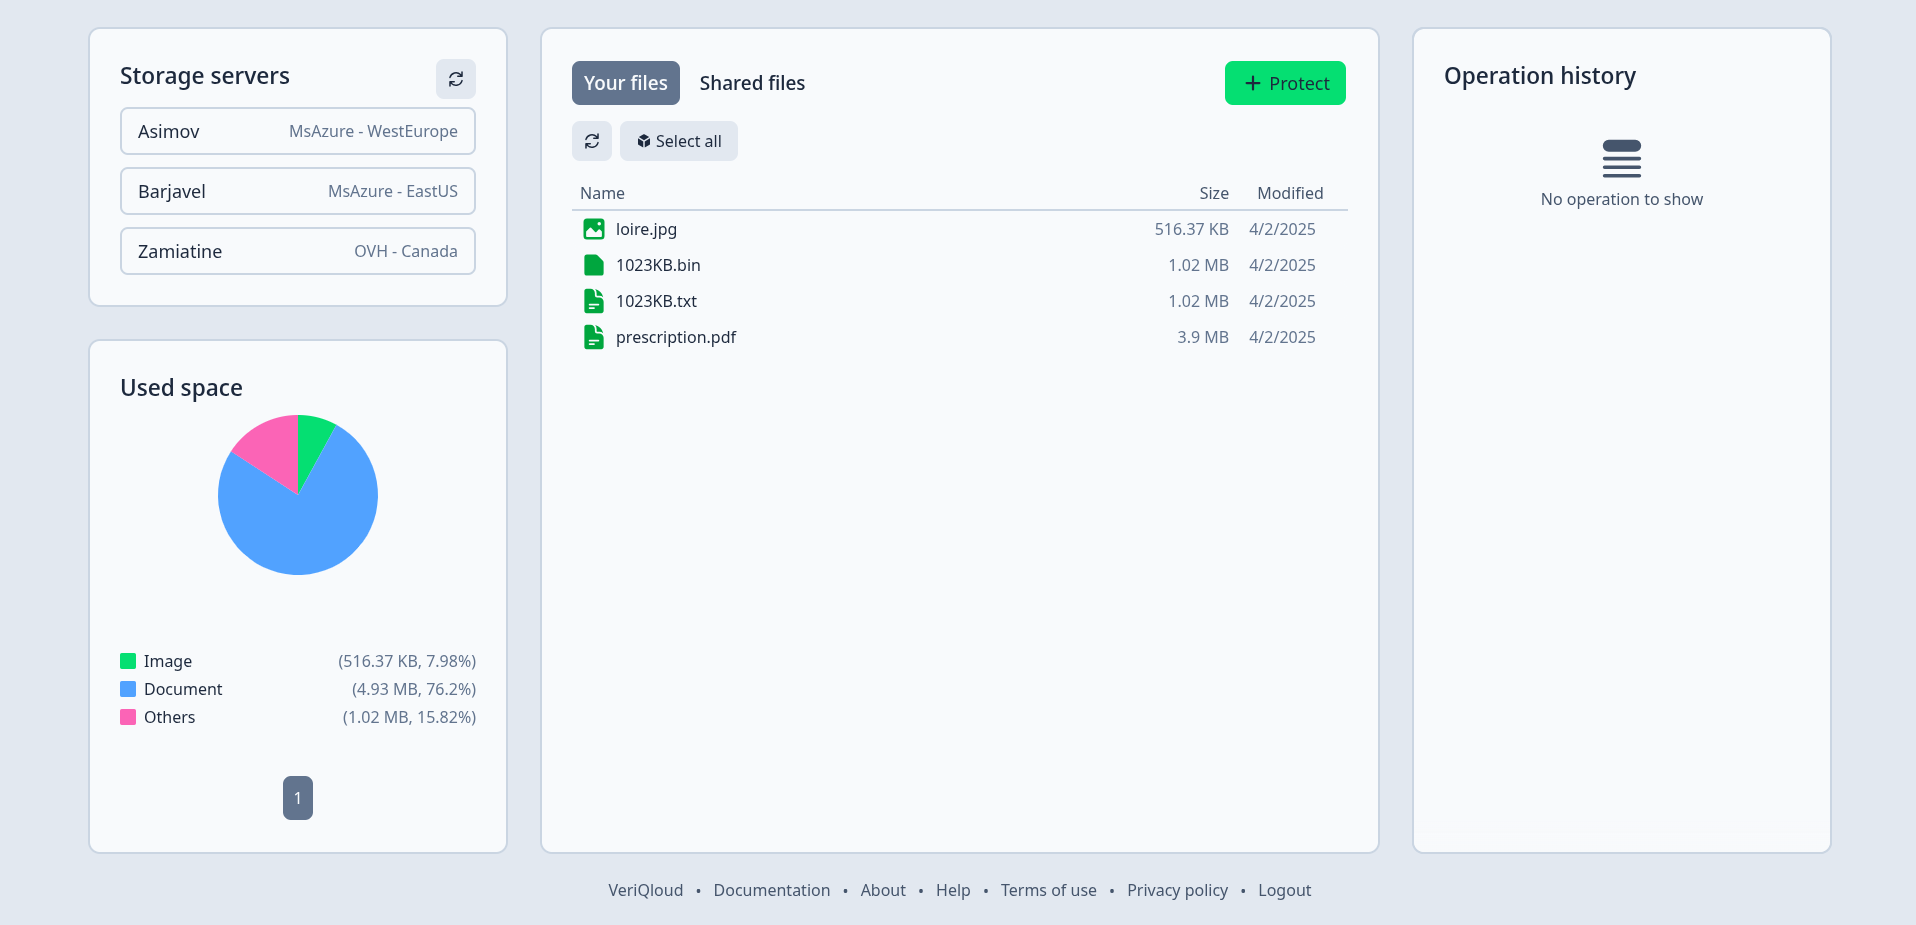
The graphical interface is divided into several sections.
Storage Servers: Lists the different storage servers available.
Used Space: A pie chart displaying the distribution of used space.
Your Files: Lists files that are stored including file names, sizes, and modification dates.
Operation History: Logs recent file operations performed by the user.
Footer: Links to "Documentation," "About," and "Help," providing additional resources or support for users. "Help" opens a tutorial popup that describes the commands and buttons.
API Documentation
Troubleshooting
This section describes the tools available to troubleshoot the software in case of error messages, whether they appear on the graphical interface or in the logs.
Support might also be included in your license, so don't hesitate to contact us for assistance with troubleshooting.
Common Errors
Here is a list of common errors you might encounter. Some of these errors are specific to the API and may not occur when using the Web client.
File too big, no file, or wrong field.: Check the file size and verify the fields in your request against the API documentation.Filename is already in use.: A file with this name is already stored. Try changing the filename.File not found on the servers.: The file you want to retrieve is not stored. Verify the list of files with the corresponding request.Empty file not handled.: The file you wanted to protect is empty.Invalid character in the filename.: The filename contains symbols that are not allowed. Change the filename.Some storage servers necessary for the operation are not connected.: Too many servers are offline for the requested operation. Please contact the Qasmat administrator.Wrong value supplied for field ... Valid values are ...: There is a problem with the form in your request.The threshold is greater than the number of servers.: Verify the connected storage servers, the threshold must be equal or lower.The threshold must be greater to 1: Modify the threshold in the request to be greater than 1.
Logs
The proxy server and storage servers of Qasmat produce logs that might be helpful for troubleshooting the solution in case of a problem. These logs are accessible via the command:
kubectl -n <namespace of the solution (qasmat)> logs <name of the pod>
The logs are organized into different levels (debug, warn, error, etc.) and provide more information than the API responses.
What is Qasmat?
Qasmat is a distributed secure storage software based on the Lincos protocol, which itself is built upon Shamir's Secret Sharing scheme.
Shamir's Secret Sharing is a cryptographic method that divides a secret into several shares. The secret can only be reconstructed by combining a certain number of these shares. This is achieved by creating a polynomial where the secret is a point on the graph, and shares are other points. To reconstruct the secret, a minimum number of shares are used to recreate the polynomial through Lagrange interpolation. This method ensures security as long as the number of shares combined is less than the threshold.
Lincos is a protocol that includes a secret sharing scheme, such as Shamir's, to ensure the confidentiality of data at rest. The protocol also describes how to manage confidentiality in transit, integrity, and authentication to achieve long-term unconditional security.
Finally, Qasmat is an implementation of this protocol in Rust. It consists of two programs:
- The proxy: It interacts with the user via an API, implements the Shamir and Lagrange algorithms, handles integrity proofs, etc.
- The storage servers: They respond to requests from the proxy server by storing or retrieving shares in their database.
The Math Behind
Imagine having to draw a line passing through a single point; there are infinitely many possibilities. However, if two different points are required, only one unique line is possible. This simple idea is at the heart of Shamir's Secret Sharing and Lagrange's interpolation, upon which Qasmat is built.
The line is replaced by a polynomial of degree ( k-1 ), whose value at zero is the secret to be protected, and other coefficients are chosen at random. Then, at least ( k ) distinct points of this polynomial are distributed across distant servers.
To recover the secret, at least ( k ) points of the polynomial are retrieved from different servers, and the polynomial is reconstructed using Lagrange's interpolation (visualize here). ( P(0) ), corresponding to the secret, is then computed.
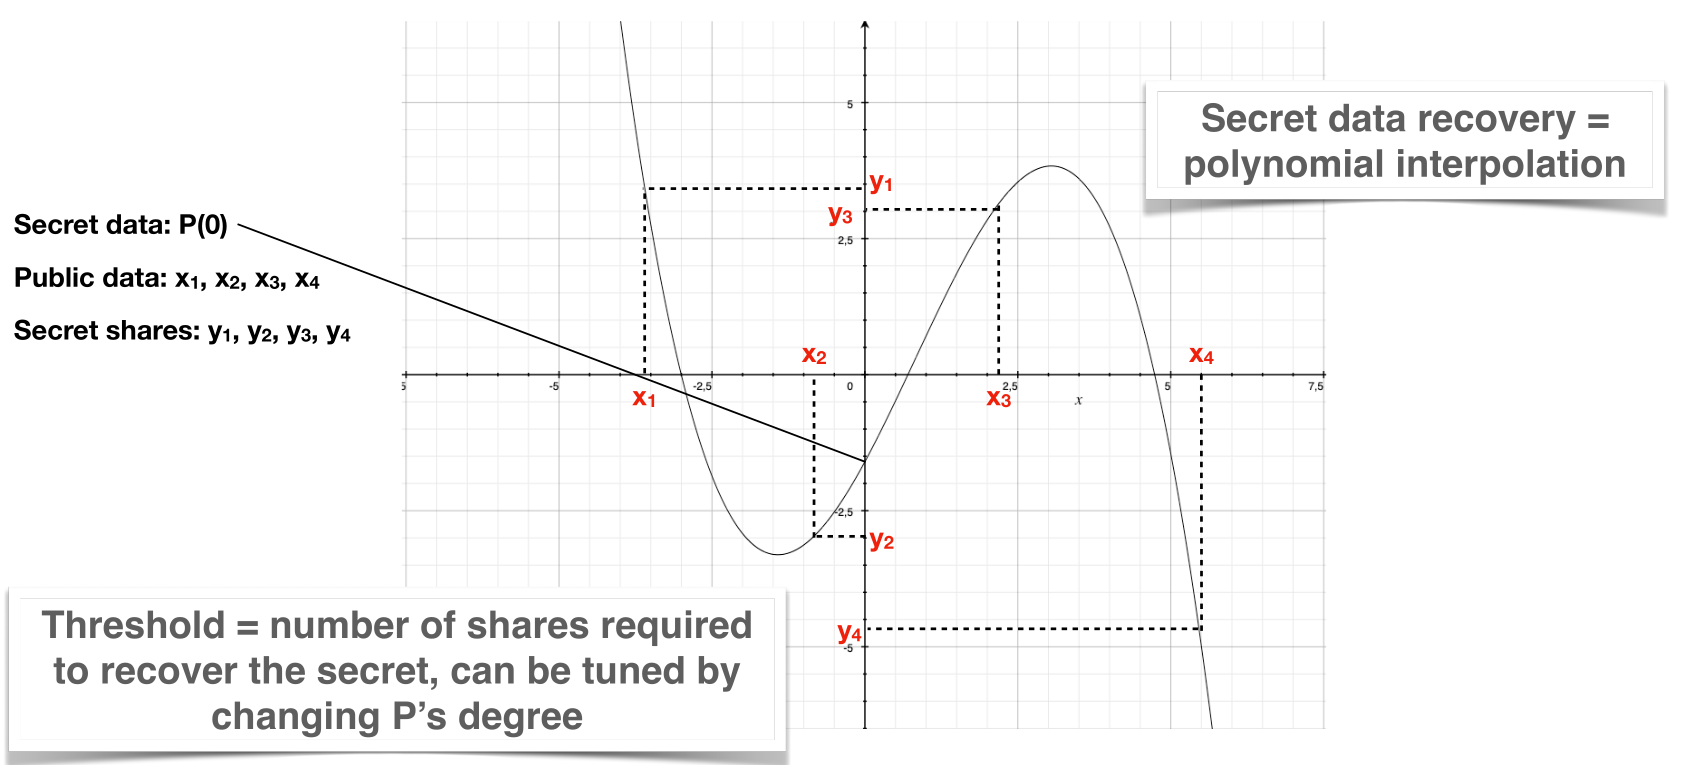
The number of points distributed (( n )) must be greater than ( k ). These two values constitute a threshold (( k, n )), whose value is determined according to the required security level.
Since the coefficients are integers, all operations are performed modularly. The modulus is a prime number, which helps avoid basic attacks.
A File Journey
First, the file is sent from the user's browser to the proxy server via HTTP/HTTPS. Due to the modulus used in all calculations, the file is split into chunks smaller than the modulus, referred to as parts.
Each part undergoes Shamir's Secret Sharing, creating ( n ) shares. Once enough shares are ready to be sent to a specific storage server, the communication module triggers a request-response exchange with that server.
Once all parts have been processed, a description of the file containing all the necessary information is stored on the proxy server.
Protection of a File (GIF)
Retrieval of a File (GIF)